🍂September October November

As you wait, you can get a head start planting seeds, mainly broccoli, cabbage, Chinese cabbage, cauliflower, lettuce, beans, peas, and onions, indoors.
My experience is that growing fall veg from seeds isn't all hard work to do if we protect the young plants from hot sun, dryness, and bugs.
Growing seedlings is also saving time and money. You can grow hundreds of them (see picture above), in fact, it`s wise to raise more plants -- when the temperature remains warm -- to ensure that you have enough supply of veg during winter, and early spring when vegetable price go up, and your choices are limited.
(preferably in mid-August) before transplanting seedlings outdoors in fall.

As the temperature begins to wind down, harvest summer veg early (if needed) to make room for the new plants.
Gather garden waste, chop coarse materials, and layer with green and brown leaves. Add manure, garden soil and make a compost pile.
Dig and prepare beds described in Prepare Vegetable Bed.
Set out transplants of broccoli, cabbage, cauliflower, Chinese cabbage, lettuce, onions, peas and the like when the weather still remains warm.
Sow carrots, radish, turnips, mustard greens, spinach, and other leaf and root crops directly in garden beds later in the year (preferably by mid-December) when soil remains warm.
Be sure to protect your baby-plants from hot sun and bugs if needed.
Be sure to protect your baby-plants from hot sun and bugs if needed.
Fall veggie should hold through the winter as long as it doesn`t freeze for a long time, and your garden only gets a brush of snow in winter.
Grow Chinese Cabbages:

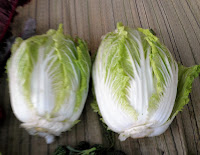
Chinese cabbages ( see the picture, L) are a cool-weather vegetable, need to be planted in the right time in fall when the weather is cool. (preferably in September) Planting too early, or too late wouldn`t produce heads!
Sow seeds in pots (See: Grow Seeds in Pots) in mid-August. You can sow seeds directly in the garden (See: Prepare Vegetable Bed).
When five to six leaves appear transplant seedlings 30 to 40 cm apart in full sun.
Plant seedlings in different intervals (preferably every two weeks) for continuous crops in winter and spring.
 Net young plants to prevent bugs feast on your cabbage leaves!

Chinese cabbages are mostly frost-tolerant. You can tie the outer leaves together (see the picture) to protect the inner leaves from snow and hard frost.
During growing season, sprinkle fertilize around the plants for a bigger harvest.
Harvest Chinese cabbages by cutting the heads off, throw away the browning and bug damaged leaves if there are any. Stir-fry sweet and tender inner leaves, or enjoy them in Nabe-soup or salads. You can preserve Chinese cabbage by wrapping them in a newspaper in the refrigerator for several weeks.
 Radish very in color and size, and they are easy to grow in fall and in spring. Japanese daikon, are growing in fall for winter and spring harvest.
Use a shovel, push and dig in 30 - 40 cm., turn the soil up, and remove any rocks, woods or other obstructions from the bed. Obstructions in the soil or replanting would create 'ghost daikon.` ( See picture below) Level the surface with a cut PVC pipe.
Make rows of 2 cm. depth circles every 40 or 45 cm. apart by pushing a can or bottle in the bed.
In early fall sow 4 - 5 daikon seeds in the circles and cover the seeds with fresh soil. For small verities of radish, you may empty a small pack of seeds in garden beds, thin and eat them as they grow big.
Water gently. Don`t let the daikon beds dry up until the seeds germinate.
 In about ten days you should have rows of daikon seedlings in circles with 45 cm. apart. Thin seedlings (see picture) in different stages once they are 3 cm. tall, and leave a single healthy plant in each circle.
Daikon should not need much feeding if planted in fertile soil with mature compost, however, you may want to add 10 - 10 - 10 fertilizer in their growing season. (See daikon plants below).

Finish daikon harvesting in late winter, or early spring, otherwise they will flower and become woody.
You can store daikon with their tops cut off in plastic bags in the refrigerator for about a month. Gardeners can preserve fresh daikon by burying them in soil or snow in winter months.
The process of growing other verities of radish, beets, turnip, etc. is almost the same as daikon. The only difference is the King of the radish (daikon) grow bigger, deeper in the soil, and needs more space.
(See red daikon below especially grew for pickling)


How to pickle daikon:
Wash, peel and chop two medium sizes pink /red daikons ( see picture) into circles, and put them in Ziploc. Add three spoons of salt and rub well. Remove air from the bag and close it tight. Put the bag in a bowl and knead -- put some weights, books, etc. on the bag -- the daikon for a day. Expel all water from the bag. Add vinegar and brown sugar as you like. You may add red chilies to make the pickle hot. Put the bag in the refrigerator. Pickle daikon should be ready in two days. ( See picture). You can preserve pickled daikon in a refrigerator for about three weeks. Enjoy!
During growing season, sprinkle fertilize around the plants for a bigger harvest.
Harvest Chinese cabbages by cutting the heads off, throw away the browning and bug damaged leaves if there are any. Stir-fry sweet and tender inner leaves, or enjoy them in Nabe-soup or salads. You can preserve Chinese cabbage by wrapping them in a newspaper in the refrigerator for several weeks.

Grow Daikon:

Use a shovel, push and dig in 30 - 40 cm., turn the soil up, and remove any rocks, woods or other obstructions from the bed. Obstructions in the soil or replanting would create 'ghost daikon.` ( See picture below) Level the surface with a cut PVC pipe.
Make rows of 2 cm. depth circles every 40 or 45 cm. apart by pushing a can or bottle in the bed.
In early fall sow 4 - 5 daikon seeds in the circles and cover the seeds with fresh soil. For small verities of radish, you may empty a small pack of seeds in garden beds, thin and eat them as they grow big.
Water gently. Don`t let the daikon beds dry up until the seeds germinate.

Daikon should not need much feeding if planted in fertile soil with mature compost, however, you may want to add 10 - 10 - 10 fertilizer in their growing season. (See daikon plants below).

You can store daikon with their tops cut off in plastic bags in the refrigerator for about a month. Gardeners can preserve fresh daikon by burying them in soil or snow in winter months.
The process of growing other verities of radish, beets, turnip, etc. is almost the same as daikon. The only difference is the King of the radish (daikon) grow bigger, deeper in the soil, and needs more space.
(See red daikon below especially grew for pickling)


How to pickle daikon:
Grow leeks:

Leeks ( see picture) are the relatives of the onion family that don`t produce bulbs.
These long white leafy stems vegetable is anti-bug, prefer mild climate, and they are easy-to-grow.
Leeks don`t require much room and can be grown in a small garden, or in containers without much care.
You can grow leeks from seeds, nursery seedlings, or propagate shoots outdoors.
To get a head start, plant nursery seedling or propagate shoots from plants bought previous years.
Select a well-drained site that gets full sun. Dig a 20 cm deep and 15 cm wide trench and spread and mix 1 kg of manure or compost and 100 gm of fertilizer/m2 in the bottom of the trench. Wait for a week before planting.
In late August set the seedlings 5 ~10 cm apart in a row in the bottom of the trench. (You can just lay seedlings in a shallow trench without doing much digging).
Cover the roots with straws or newspapers and over the straws with loose soil to prevent seedling roots` drying up. Water if the soil is dry.
As the plants grow, sprinkle fertilizer, gradually fill in the trench with soil, and cover the developing stalks to deprive them of sunlight. The important thing is to produce long white stakes by hilling up around the plants.
Leeks planted in late summer can be harvested throughout the winter and spring. Harvest leeks by gently dig up the stalks with a spade or fork. Cut roots with scissors, wash, shake off the water, wrap in newspapers and refrigerate.
 Leeks are widely used in traditional Japanese cuisine. Freshly chopped mild leeks taste great over hot soup, cold tofu, and a green salad.
Propagating Leeks:
Don`t harvest all your leeks, leave some in the ground.
In late spring, the leek stalks will flower and get hard. Cut about half of all stalks.
 By late summer new shoots will emerge from the main stalks. Dig up, separate the young stems from main stalks and transplant young stems to their new beds. ( See picture below). You enjoy juicy young stems too! leftovers!
These long white leafy stems vegetable is anti-bug, prefer mild climate, and they are easy-to-grow.
Leeks don`t require much room and can be grown in a small garden, or in containers without much care.
You can grow leeks from seeds, nursery seedlings, or propagate shoots outdoors.
To get a head start, plant nursery seedling or propagate shoots from plants bought previous years.
Select a well-drained site that gets full sun. Dig a 20 cm deep and 15 cm wide trench and spread and mix 1 kg of manure or compost and 100 gm of fertilizer/m2 in the bottom of the trench. Wait for a week before planting.
In late August set the seedlings 5 ~10 cm apart in a row in the bottom of the trench. (You can just lay seedlings in a shallow trench without doing much digging).
Cover the roots with straws or newspapers and over the straws with loose soil to prevent seedling roots` drying up. Water if the soil is dry.
As the plants grow, sprinkle fertilizer, gradually fill in the trench with soil, and cover the developing stalks to deprive them of sunlight. The important thing is to produce long white stakes by hilling up around the plants.
Leeks planted in late summer can be harvested throughout the winter and spring. Harvest leeks by gently dig up the stalks with a spade or fork. Cut roots with scissors, wash, shake off the water, wrap in newspapers and refrigerate.

Propagating Leeks:
Don`t harvest all your leeks, leave some in the ground.
In late spring, the leek stalks will flower and get hard. Cut about half of all stalks.
 By late summer new shoots will emerge from the main stalks. Dig up, separate the young stems from main stalks and transplant young stems to their new beds. ( See picture below). You enjoy juicy young stems too! leftovers!
Grow Potatoes:

Potatoes thrive in well-drained, loose soil and don`t need much liming. Take a soil sample test before planting. If soil pH level is 6 to 7 range do nothing, otherwise sprinkle 50 gm lime per square meter over the plot and mix lime with the soil.
Wait for a week for the lime to settle in.
Dig 15 ~ 20 cm wide and deep straight trenches. Spread and mix 2 kg of manure or compost, and 100 gm of fertilizer per square meter in the bottom of the trench. Wait for a week or so before planting seed potatoes.
Plant seed potatoes -- don`t cut for fall planting -- 25 ~30 cm apart eye side up, and cover the trenches more than half with soil. Potato seedlings have enough water in them, water when shoots break the ground in a month or so after planting.
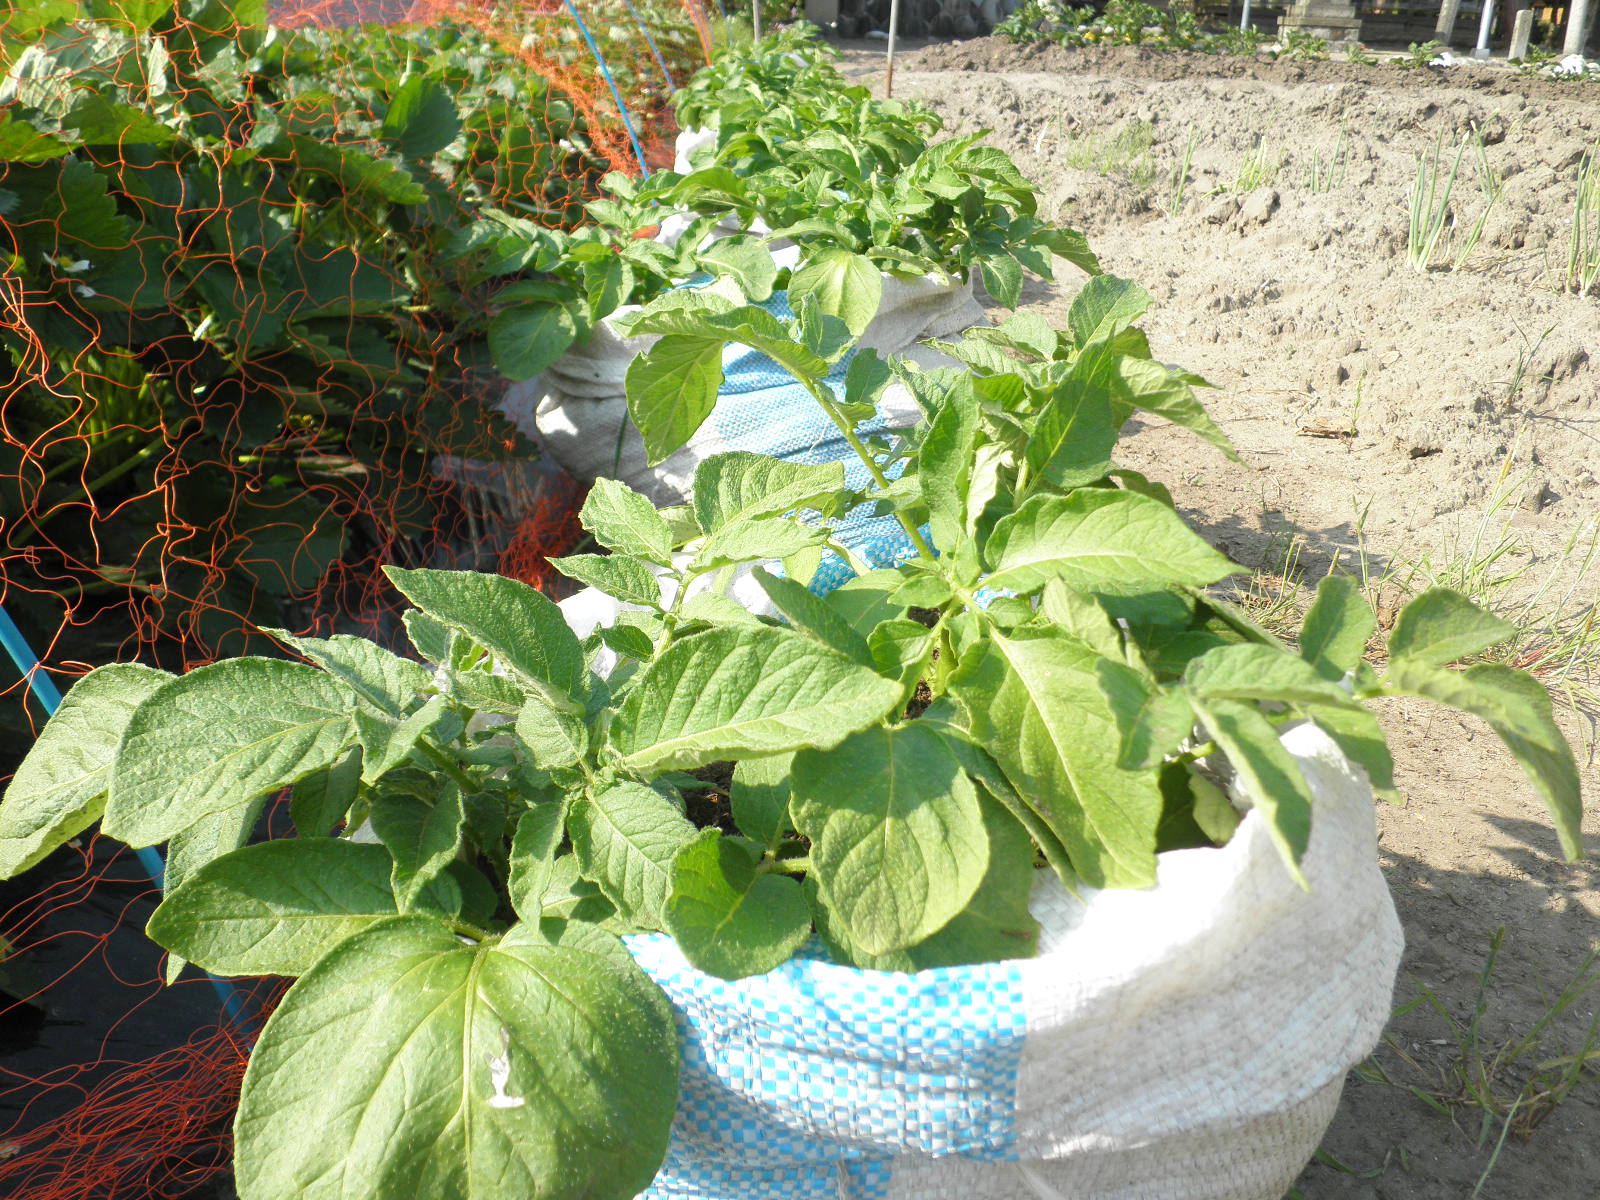
When shoots reach 15 ~ 20 cm tall, cut all but two or three healthy stems per potato. ( See picture) Stem cutting produces bigger potatoes by sending extra nutrition to the tubers.
Toss 20 ~ 30 gm of fertilizer per square meter, and hoe loose soil up around the base of the plants and cover the roots and bury the stems halfway.
Water the ground if it is dry, and continue hilling during the growing season until potato plants bloom. Be sure to keep the tubers covered, or sun will turn potatoes green and bitter. Potatoes should be ready for harvest in about three months.
Grow Potatoes in sacks:
Fill about half of a sack, plastic bag or container (must have holes for water release) with potting or fertilized garden soil.
Plant one or two seed potatoes (depends on the size of the sack) inside the sack and cover with a layer of soil.
Sprinkle fertilizer around the plants in the sack. Gradually fill the sack with soil as potato shoots get taller. When shoots reach about 20 cm, cut all but two healthy stems per potato
( see picture).
Water and keep the sack moist. When tops of the vines die, harvest potatoes by emptied out the bags.

Do a test digging before harvesting all your potatoes. Gently dig up a potato plant. If most tubers are small, potatoes are not yet ready to harvest. Wait until tops of the vines start to die. In cold climate, potatoes stay fresh in the ground for a month or so. Harvest what you need, and leave the rest in the ground. Enjoy fresh potatoes a while in winter months.
Wash harvested potatoes right before use. If they feel wet, dry potatoes for about two to three days, and store them in a cool, dry, and dark place. I store potatoes in cardboard boxes cover with newspapers.
Grow Onions:

Till in 10 kg of manure, 100 gm of fertilizer and 30 gm of oil cake, and phosphorus per square meter. Make a 15 ~20 cm high flat raise bed.
Best way to grow lots of onions in a small space is to draw 20 × 20 cm squares on the bed by lightly press a long stick horizontally and vertically every 20 cm apart on the beds. With this technique, you can draw hundreds of squares on seed beds.
With a chopstick punch shallow holes on the corners of each square. Drop and bury (about half of white portion of each bulb) onion sets in each and every holes as you walk along the bed. Plant any leftover seedlings at the center of the squares.
When you are done, you should have a bed with hundreds of onion seedlings transplanted approximately 20 cm from each other! (See side picture)
Onion things to remember:
- Sow onion seeds as evenly possible (preferably in mid-August) in a tray. Don`t thin onion seedlings in their beds. Small seedling gradually grows bigger as time passes. When the third leaf appears, gently dig up the seedlings with a wide-bladed trowel and transplant them to their new beds.
- Onions are slow growing veggie, need six months to mature. Select an area on the side of the garden that gets plenty of sunshine all day long.
- Don`t bury onion seedlings too deep in the soil. Push about half of the white portion of each bulb in the soil to get them to stand up. Deep planting will rot the little bulbs, or make it hard for the bulbs to rise and grow big.
- If leaves droop after transplanting, trim off ( about halves) the leaves with scissors. Leaf trimming would send more nutrients to the bulbs.
- Onions don`t need much space to grow. keep space (15 ~ 20 cm) between seedlings for bulbs to grow big. Be sure to water well when the soil is dried.
- Onion seedlings are mostly cold-tolerant, but they may not survive in frozen ground. Transplant onion seedlings earlier (preferably by mid-November) to make them harder to stand cold. To protect seedlings from extreme cold use black plastic mulch with openings especially designed (Available in Garden Center) for onion cultivation.
- Sprinkle 50 gm fertilizer per square meter every month in growing season until the bulbs become big enough to raise up the soil.
- Onions don`t need hilling. Don`t put the soil back around the onion bulbs.


Cut off the top and the bottom roots of the plants. Dry them for several weeks, and store in a cool, dark and dry place.
I like to grow especially red onions that are expansive and rarely available in Japan. Freshly harvested raw onions is a great treat in salad, sandwiches, burgers!
Grow Broccoli, Cauliflower, Cabbages:


Grow Strawberries:

Since strawberry plants stay long (need more than six months to bear fruits) in soil use slow-realized fertilizers that provide nutrition for the plants as they grow big.
 Mix 100 gm / m2 of lime into the soil thoroughly ten days before planting. For strawberry a pH level of around 6.5 is good. Incorporate 2kg of aged manure or compost, 50 gm of oil cake, 30 gm of phosphorus and 100 gm of 15-15-15 chemical fertilizer. Make sure not to use too much phosphorus that might burn your plants. My experience is, extra phosphorus makes strawberries sweet!
Mix fertilizers into the soil lightly. Strawberries don`t root deep in the soil so their nutrition needs to be where they can reach them. Make a raised bed, water thoroughly and cover the bed with a black plastic mulch. Plastic mulch Protect young plants from frost by keeping the soil warm and help retain moisture.
Some gardeners wait until spring to mulch their strawberry patches, but it becomes a challenge to cover beds with plastic mulch after planting when the plant starts to grow. Buy strawberry plants -- don`t need to be expansive kinds -- in local shops in November. Before planting arrange plants (see picture) to see how they look in their new bed.

During winter, plants remain dormant. ( See picture right) Remove dead leaves and early flowers if there any. In winter (February), and in early spring (March ~ April) open one side of the mulch, and sprinkle 10 –10 – 10 fertilizer and phosphorus around each plant and close the mulch.

To keep the birds and animals away, cover the strawberry patch with nets when the fruit starts to turn red.
Harvest strawberries in late spring (May ~ June), when they fully ripen – they will start turning red from top to bottom. To enjoy sweet, juicy berries that may not available in local markets, pick them when the tips of bottom become completely red. You can preserve strawberries in the refrigerator for about three days. Don`t wash harvested strawberries. Wash them just before eating.


After harvesting, cut back the foliage, remove plastic mulch, and any plants that didn't produce strawberries. The plants will send out hundreds of runners – “daughters” plants, which in turn will send out their own “granddaughters” plants. Pick the granddaughters when they have established themselves in the ground.
You can set them in pots buried in the ground (See the picture above) and transplant them elsewhere in the garden.
Why planting granddaughters, not daughters? DNA things? Nope, not really. Since daughters stay close to mothers (the main plants) they are more susceptible to “get the disease” from their mothers. So planting granddaughters are a better choice!

John Green. All Rights Reserved
No comments:
Post a Comment